
New Laptop Ubuntu 14.04.4 Installed but Touchpad and mousepad not working Solution.
Upgrade Your OS to ubuntu 16.04 or If you are using the customised version of itschool ubuntu 14.04.4,
(only for 64 bit machine).Download the four files copy them into a folder ,inside the folder right click an empty space select open in terminal then type the command "sudo dpkg -i * .deb" .after finishing the installation Reboot the system.
http://kernel.ubuntu.com/~kernel-ppa/mainline/v4.9.21/linux-headers-4.9.21-040921-generic_4.9.21-040921.201704080434_amd64.deb
http://kernel.ubuntu.com/~kernel-ppa/mainline/v4.9.21/linux-headers-4.9.21-040921_4.9.21-040921.201704080434_all.deb
http://mirrors.kernel.org/ubuntu/pool/main/l/linux-firmware/linux-firmware_1.161.1_all.deb
.........................................................................................................
Core i3 processor ഉള്ള കമ്പ്യൂട്ടറില് 10.04.12 install ചെയ്ത ശേഷം ഈ പാച്ച് install ചെയ്താല് മതി. Office package, internet തുടങ്ങിയവയുമായി ബന്ധപ്പെട്ട പ്രശ്നങ്ങള് പരിഹരിക്കാം.
SAMSUNG LAPTOP കളില് Sound പ്രശ്നം പരിഹരിക്കുന്നതിന് ഈ പാച്ച് install ചെയ്താല് മതി.
Dell printer Driver click here to download.
Read instruction below before installing
How to install Malayalam Fonts in Ubuntu ?
For ubuntu rename the fonts as .fonts,then paste
them in the home directory.
For downloading all fonts please click here.
OR
Note : If You are using windows please paste these fonts in the fonts directory
in the control panel.
HP 1018 Printer Installation
1.Download the installation files from the following link
2.Right click on the hplip.tar.gz and select Extract Here
3.Open the extracted file and double click on the install file.
4.Restart the system
Now your Printer is ready.
കടപ്പാട് : Hakeem Master Trainer,IT School Malappuram
ഫോട്ടോ ക്രോപ്പ് ചെയ്യുന്ന വിധം
ജിമ്പ് വഴി ക്രോപ്പിങ്ങ് ചെയ്യാന് എല്ലാവര്ക്കും അറിയാം. അതിനായിതാ മറ്റൊരു സോഫ്റ്റ്വെയറിനെക്കൂടി പരിചയപ്പെടുത്താം.
1. ഫോള്ഡറിലെ കുറച്ചു ചിത്രങ്ങള് ഡ്രാഗ് ചെയ്ത് സെലക്ട് ചെയ്ത ശേഷം റൈറ്റ് ക്ലിക്ക് ചെയ്ത് gThumb Image Viewer തുറക്കുക.
2. വലതു വശത്തെ ചതുരത്തില് കാണുന്ന ചിത്രങ്ങളിലൊന്നില് ഡബിള് ക്ലിക്ക് ചെയ്ത് തുറക്കുക. മുകളിലെ മെനുവില് നിന്നും image-crop എന്ന ക്രമത്തില് ക്ലിക്ക് ചെയ്യുക.
3. വലതു വശത്തു തുറക്കപ്പെടുന്ന മാര്ജിനില് Aspect Ratio എന്നത് custom ആക്കിക്കൊടുക്കുകയും അതിനു താഴെയുള്ള രണ്ട് ബോക്സുകളിലും നമുക്കാവശ്യമായ വീതിയും ഉയരവും നല്കുക
4. തുടര്ന്ന് യഥാക്രമം crop, Done, Save തുടങ്ങിയ ബട്ടണുകളില് ക്ലിക്ക് ചെയ്യുക. Qulaity 100 തന്നെ ആയിക്കോട്ടെ.
5. സെലക്ട് ചെയ്ത് ഓപ്പണ് ചെയ്ത അടുത്ത ചിത്രം കാണാന് Save ബട്ടണ് അടുത്തുള്ള Right Arrow Icon (വലത്തേക്കുള്ള ആരോ ചിഹ്നം) ഉപയോഗിക്കാം. ഇതു പോലെ ക്രോപ്പ് ചെയ്യാം.
6. നാം ഉദ്ദേശിച്ച രീതിയലേക്കാണോ ചിത്രങ്ങള് ക്രോപ് ചെയ്തിരിക്കുന്നതെന്നറിയാന് പ്രിന്റെടുത്ത ശേഷം സ്കെയില് കൊണ്ട് അളന്ന് ബോധ്യപ്പെടുക.
ഒരു ഫോള്ഡറിനുള്ളിലെ മുഴുവന് ഇമേജുകളും ഒരുമിച്ച് format മാറ്റുകയോ resize ചെയ്യുകയോ ചെയ്യുന്ന വിധം
ഒരു ഫോള്ഡറിനുള്ളിലെ മുഴുവന് ഇമേജുകളും ഒരുമിച്ച് format മാറ്റുകയോ resize ചെയ്യുകയോ ചെയ്യുന്നതിനായി converseen എന്ന സോഫ്റ്റ്വെയര് ഉപയോഗിക്കാം. Digital Camera ഉപയോഗിച്ച് എടുത്ത ഫോട്ടോകള് ഇത് ഉപയോഗിച്ച് ചെറുതാക്കാവുന്നതാണ്. മലപ്പുറം ഐടി@സ്ക്കൂള് മാസ്റ്റര് ട്രെയിനറായ ഹസൈനാര് സാറാണ് ഈ സോഫ്റ്റ്വെയറിനെക്കുറിച്ച് വിവരം നല്കിയത്. ഉബുണ്ടുവില് ഇത് ഇന്സ്റ്റാള് ചെയ്യുന്നതിനായി താഴെ കാണുന്ന കമാന്റുകള് ഓരോന്നായി ടെര്മിനലില് ടൈപ്പ് ചെയ്ത് Enter ചെയ്യുക. (ഇവിടെ നിന്ന് കോപ്പിയെടുത്ത് ടെര്മിനലില് പേസ്റ്റു ചെയ്താലും മതി.)
sudo add-apt-repository ppa:faster3ck/converseen
sudo apt-get update
sudo apt-get install converseen
ഇന്സ്റ്റലേഷനു ശേഷം Application-Graphics-Converseen തുറക്കുക.
Add images ക്ലിക്ക് ചെയ്ത് image folderസെലക്ട് ചെയ്യുക. Ctrl,A എനീ keys ഉപയോഗിച് എല്ലാ
images ഉം ഒരുമിച്ച് സെലക്ട് ചെയ്യാവുന്നതാണ്. ശേഷം open ക്ലിക്ക് ചെയ്യുക. check all ക്ലിക്ക് ചെയ്ത
ശേഷം convert to എന്നതിലെ നിന്നും file format സെലക്ട് ചെയ്യുക.
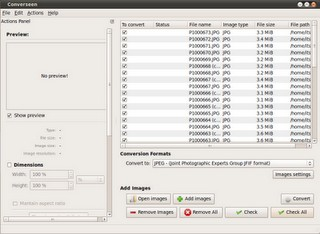
Resize ചെയ്യുന്നതിനായി ഇടതു ഭാഗത്തുള്ള dimensions എന്നതില് % മാറ്റി px ആക്കി width, height ഇവ ക്രമീകരിക്കുക. (Size 100kb യില് താഴെ ക്രമീകരിക്കുന്നതിനായി width, height ഇവ 800, 600 ആക്കിയാല് മതി.) Save in എന്നതില് folder സെലക്ട് ചെയ്യുക. ശേഷം convert എന്നതില് ക്ലിക്ക് ചെയ്യുക. സെലക്ട് ചെയ്തിട്ടുള്ള ഫോള്ഡറിലേക്ക് ഇമേജുകള് Convert ആയിട്ടുണ്ടാകും.
******************************************************************************
Phatch photo bATCH Processor
ജിമ്പിലെ ബാച്ച്പ്രോസസ്സിറില് ഫോട്ടോ പ്രോസ്സസ്സ് ചെയ്യുമ്പോള് സൈസും ക്ലാരിറ്റിയും കുറയുന്നുണ്ടോ ഇതാ ഒരു പരിഹാരം Size കുറഞ്ഞ Clarityയുള്ള Black & White ചിത്രങ്ങള്ക്കായി Phatch photo bATCH Processor
കടപ്പാട്: stjohnshss mattom
**********************************************************************
System-administration-Synaptic Package Manager-
Click on Search Button Type Phatch
Right Click on Phatch Select Mark for installation-click apply-again apply.
Phatch open ചെയ്യാനായി Application-Graphics-Phatch photo bATCH Processor Click ചെയ്യുക.


Click + to add actions - + iconല് click ചെയ്യുന്നതിലൂടെ Ations Add ചെയ്യാം .
നമുക്ക് വേണ്ട കാര്യങ്ങള് (Phatch ചെയ്യേണ്ടവ)
1.Size കുറക്കാന്

+ iconല് Click ചെയ്തശേഷം Fit Option(F press ചെയ്താല് Fitല് എത്താം ) Double Click ചെയ്യുക

തുറന്നുവരുന്ന മുകളില് കാണിച്ച Windowയില് canvas Widthല് Double Click ചെയ്യുക അവിടെവരുന്ന(<min(width,height)> )delete ചെയ്ത് 2.5 എന്നും അതിനസ്ടുത്തുള്ള px മാറ്റി cm ഉം നള്കുക.അതുപോലെ canvas Height ഉം 2.5 നള്കുക.Resolution Double Click ചെയ്ത് 500 (1000 നള്കിയാലും ഫയല് സൈസ് 50kb യെ വരൂ)നള്കുക.
step2
ഇനി ചിത്രങ്ങള് Black & White ആക്കാന് വീണ്ടും + Symbol Click ചെയ്യുക Convert Mode എന്ന Option Select(Double Click) ചെയ്യുക.

Mode double click ചെയ്ത ശേഷം

Grayscale 8-bit pixel Select ചെയ്യുക.
Step 3:
ഇനി tools menuവിലെ Execute option click ചെയ്യുക

അപ്പോള് താഴെ കാണിച്ചിരിക്കുന്ന രീതിയിളുള്ള window വരും

ഇവിടെ OK ക്ലിക്ക് ചെയ്യുക.

ഇവിടെ ഒന്നും select ചെയ്യേണ്ടതില്ല.നമ്മുടെ ആവശ്യങ്ങള്ക്കുള്ള ഓപ്ഷനുകള് ആയി ഇനി ഒരിക്കല് കൂടി Tools menu വില് നിന്നും Execute select ചെയ്യുക.

തുറന്നുവരുന്ന ഈ വിന്ഡോയിലെ Browse button Click ചെയ്ത് Source Folder Select ചെയ്യാം (process ചെയ്യേണ്ട Photo ഉള്പ്പെടുത്തിയ Folder). ഇനി types ല് നിന്നും jpg മാത്രം select ചെയ്യാം (എല്ലാം Select ചെയ്തരീതിയിലാണെങ്കില് all types click ചെയ്ത് എല്ലാം ഒഴിവാക്കിയശേഷം jpg മാത്രം select ചെയ്യുക)
Batch Button Click ചെയ്യുക.
Select ചെയ്ത ഫയലുകള് List ചെയ്യും

Continue Optionക്ലിക്ക് ചെയ്തോളൂ
Desktopല് Phatch എന്ന പേരില് ഒരുഫോള്ഡര് സ്വയം നിര്മ്മിക്കപ്പെട്ട് അതിലേക്ക് Size കുറഞ്ഞ Clarityയുള്ള Black & White ചിത്രങ്ങള് ഒഴുകിയിറങ്ങും.....................
ഉബുണ്ടു യൂസര്/റൂട്ട് പാസ്വേഡ് മറന്നു പോയാല്....?
ഉബുണ്ടുവില് യൂസര് പാസ്വേഡോ റൂട്ട് പാസ്വേഡോ മറന്നു പോയാല് അത് reset ചെയ്യാവുന്നതാണ്. റിക്കവറി മോഡ് വഴി പാസ്വേഡ് reset ചെയ്യുന്ന വിധം ഇവിടെയുണ്ട്. എന്നാല് root password സെറ്റ് ചെയ്തിട്ടുള്ള ഒരു കമ്പ്യൂട്ടറില് ഈ രീതി ഉപയോഗിക്കാന് കഴിയില്ല. grub line എഡിറ്റ് ചെയ്താല് root password സെറ്റ് ചെയ്തിട്ടുള്ളവയിലും അല്ലാത്തവയിലും പാസ്വേഡ് മാറ്റാവുന്നതാണ്. അതിനുള്ള സ്റ്റെപ്പുകള് ചുവടെ കൊടുക്കുന്നു.
- കമ്പ്യൂട്ടര് ബൂട്ട് ചെയ്ത് വരുമ്പോള് Grub മെനുവിലെ ആദ്യത്തെ വരി സെലക്റ്റ് ചെയ്ത് കീബോര്ഡിലെ E എന്ന അക്ഷരം അമര്ത്തുക.(Grub മെനു കാണാത്ത കമ്പ്യൂട്ടറുകളില്(ഉബുണ്ടു മാത്രമുള്ളവ) കമ്പ്യൂട്ടര് ബൂട്ട് ചെയ്ത് വരുമ്പോള് Shift അല്ലെങ്കില് Escape കീ അമര്ത്തിപ്പിടിച്ചാല് Grub മെനു പ്രത്യക്ഷപ്പെടും.)
- ഇപ്പോള് കിട്ടുന്ന ഭാഗത്ത് ro എന്നത് rw എന്നാക്കി മാറ്റി ആ വരിയുടെ അവസാനം init=/bin/bash എന്ന് ടൈപ്പ് ചെയ്ത് ചേര്ക്കുക.

- ശേഷം Ctrl, X എന്നീ കീകള് ഒരുമിച്ച് അമര്ത്തുക. ഈ മാറ്റങ്ങളോടു കൂടി സിസ്റ്റം ബൂട്ട് ചെയ്യുന്നതാണ്.
- യൂസര് പാസ്വേഡ് മാറ്റാനായി കഴ്സര് blink ചെയ്യുമ്പോള് താഴെ കൊടുത്തിട്ടുള്ള കമാന്റ് ടൈപ്പ് ചെയ്ത് Enter ചെയ്യുക.
- passwd യൂസര്നാമം(Eg: its എന്ന യൂസറിന്റെ പാസ്വേഡ് മാറ്റുന്നതിനുള്ള കമാന്റ് passwd its എന്നാണ്.)
- Enter new unix password എന്നതില് പുതിയ പാസ്വേഡ് ടൈപ്പ് ചെയ്ത് Enter ചെയ്യുക.(ടൈപ്പ് ചെയ്യുന്നത് കാണാന് കഴിയില്ല)
- Retype new unix password എന്നതില് ഒരിക്കല് കൂടി പാസ്വേഡ് ടൈപ്പ് ചെയ്ത് Enter ചെയ്യുക. Password changed successfully എന്ന മെസേജ് ലഭിക്കുന്നതാണ്.
- Restart ചെയ്യുന്നതിനായി Alt,Ctrl,Delete എന്നീ കീകള് ഒരുമിച്ച് അമര്ത്തുക.
- Root password മാറ്റുന്നതിനായി passwd എന്ന കമാന്റ് ഉപയോഗിച്ച് മുകളില് കൊടുത്തിട്ടുള്ള സ്റ്റെപ്പുകള് ചെയ്യുക.

Prepared by Augustin Bernad
- login as normal user right click on the desktop --->Open in Terminalgive command --->sudo passwdterminal asks password of normal user:then enter new unix password (for your better convenience give root as password)retype new unix passwordmessage appears on the terminalpasswd: password updated successfullyclose the terminallog out
- login as root(your password is root)paste below shown link on mozilla browser.save downloaded file......open home/downloads/right click on the raducotescu-CanonCAPTdriver-release-2.4-0-gc8ea9f9.tar.gzand select ---> Extract hereextracted folder ----->raducotescu-CanonCAPTdriver-c8ea9f9---- apears on dowlads folder
- open ---> raducotescu-CanonCAPTdriver-c8ea9f9
- right click on the folder ---->Open in terminal
- type command or paste below shown command( for this go to terminals edit menu and select paste)sudo ./canonLBP_install.sh LBP2900(at the same time pls check your printer is plugged on and usb data cable connected to the system.)Follow the messages and the instructions on screen in order to completethe installation.
- Give below shown commands one by one.sudo /etc/init.d/cups restartsudo /usr/sbin/lpadmin -p LBP2900 -m CNCUPSLBP2900CAPTK.ppd -v ccp:/var/ccpd/fifo0 -E
sudo /usr/sbin/ccpdadmin -p LBP2900 -o /dev/usblp0
sudo /etc/init.d/ccpd start
sudo /etc/init.d/ccpd start
- go to system--> administration ---> Printing ---> right click on the installed printer LBP2900 and select ---> set As default
- restart the computer
- once again login as root
- if problem arises in printing then try again 5th step of the above tutorial(5th step only)
- did not type more commands
- restart the system
- login as normal user
good luck.......
your problem solves any of the below said printers canon series
* LBP-1120 * LBP3250
* LBP-1210 * LBP3300
* LBP2900 * LBP3310
* LBP3000 * LBP3500
* LBP3010 * LBP5000
* LBP3018 * LBP5050
* LBP3050 * LBP5100
* LBP3100 * LBP5300
* LBP3108 * LBP6300dn
* LBP3150 * LBP7200C
* LBP3200 * LBP9100Cdn
* LBP3210
If you want the PDF note pls click here
ഉബുണ്ടു ഉപയോഗിക്കുന്നവര് അത്യാവശ്യം അറിഞ്ഞിരിക്കേണ്ട ചില കമാന്റുകളും അവയുടെ ഉപയോഗങ്ങളും ചുവടെ നല്കിയിരിക്കുന്നു.
| കമാന്റ് | ഉപയോഗം |
| df -h | filesystem disk space usage for all partitions. |
| free -m | the amount of free and used memory in the system. |
| lsb_release -a | version information for the Linux release you're running |
| fsck | File system consistency check and repair |
| sudo nautilus | To open a file in the file system with root previleges |
| sudo passwd | To give root password |
| sudo lshw | to know the hardware information |
| lspci | to know the graphics card |
| ls usb | to know the usb devices connected |
| sudo cp -R /etc/apt /home/its/Desktop | to copy apt folder to its's Desktop(Here cp -R command is used to copy a folder and its content from one location to another. kalolsavam 'lampp' folder can also copy like this. |
| sudo chmod -R 777 /home/its/Desktop/apt | to give permission for copied opt folder |
ഉബുണ്ടുവില് IP Address സെറ്റു ചെയ്യുന്ന വിധം
ഉബുണ്ടുവില് ഇന്റര്നെറ്റ് ഉപയോഗിക്കുന്നതിന്നായി IP Address സെറ്റു ചെയ്യേണ്ടതില്ല.ഇന്സ്റ്റാള് ചെയ്തു കഴിഞ്ഞാല് Automatic IP(DHCP) വഴി നെറ്റ് കിട്ടുന്നതാണ്. എന്നാല് നെറ്റ്വര്ക്ക് ഉപയോഗിച്ച് file sharing നടത്തുമ്പോള് Manual IP address കൊടുക്കേണ്ടതായി വരാറുണ്ട്. അതുപോലെ കലാമേള പോലുള്ള മേളകള്ക്കും നെറ്റ്വര്ക്ക് ഉപയോഗിക്കുമ്പോള് Manual IP address കൊടുക്കുന്നതാണ് നല്ലത്. ഇതിനായി താഴെ കൊടുത്തിട്ടുള്ള സ്റ്റെപ്പുകള് ചെയ്യുക.
- System-Preferences-Network Connections ക്ലിക്ക് ചെയ്യുക.
- Wired എന്നതില് ക്ലിക്ക് ചെയ്തതിനു ശേഷം Auto eth0/eth4...എന്നത് സെലക്റ്റ് ചെയ്ത് edit ക്ലിക്ക് ചെയ്യുക.
- IPV4 settings എന്നതില് ക്ലിക്ക് ചെയ്ത് Method എന്നതില് Manual ആക്കുക.

- Address എന്നതിനു താഴെയുള്ള ബോക്സില് കമ്പ്യൂട്ടറിന്റെ IP Address നല്കുക.(Eg. 192.168.1.10)
- Net Mask എന്നതില് 255.255.255.0 എന്ന് ടൈപ്പ് ചെയ്യുക.
- Gateway എന്നതില് 192.168.1.1 എന്ന് ടൈപ്പ് ചെയ്യുക.
- ആക്റ്റിവേറ്റ് ആക്കുന്നതിനായി താഴെ Blank space ല് ക്ലിക്ക് ചെയ്യുക.
- DNS Servers എന്നതില് 192.168.1.1 എന്ന് ടൈപ്പ് ചെയ്യുക.
- Available to all users ടിക്ക് ചെയ്ത് Apply ക്ലിക്ക് ചെയ്യുക.
- Password നല്കി Enter ചെയ്യുക.
- കമ്പ്യൂട്ടര് restart ചെയ്യുക.
Desktop എങ്ങിനെ പൂര്വ്വ സ്ഥിതിയിലാക്കാം?
Desktop Settings മാറിക്കഴിഞ്ഞാല് Desktop സെറ്റിംഗ്സ് പഴയ സ്ഥിതിയിലാക്കാന് ഹസൈനാര് മങ്കട സാറിന്റെ(മലപ്പുറം എം.ടി) homefresh എന്ന സ്ക്രിപ്റ്റ് ഉപയോഗിക്കാവുന്നതാണ്. Download script
ഡൗണ്ലോഡ് ചെയ്ത് കിട്ടുന്ന ഫയല് right click ചെയ്ത് Properties-Permissions ക്ലിക്ക് ചെയ്യുക. Allow execute permission എന്നത് tick ചെയ്യുക. ശേഷം ഫയല് double click ചെയ്ത് run in terminal ക്ലിക്ക് ചെയ്യുക. logout/restart ചെയ്യുക. Desktop പഴയ അവസ്ഥയിലായിട്ടുണ്ടാകും. പാനലുകള്ക്ക് എന്തെങ്കിലും പ്രശ്നങ്ങള് സംഭവിച്ചാലും ഈ script ഉപയോഗിക്കാവുന്നതാണ്.
Mobile Broadband
GPRS കണക്ഷന് വഴി മൊബൈല് ഫോണില് നിന്നും കമ്പ്യൂട്ടറില് ഇന്റര്നെറ്റ് ഉപയോഗിക്കാവുന്നതാണ്. ഇതിനായി മൊബൈലില് GPRS ആക്റ്റിവേറ്റ് ചെയ്യേണ്ടതാണ്. GPRS നായി BSNLന് പലതരം പ്ലാനുകള് നിലവിലുണ്ട്. 13 രൂപയുടെ പ്ലാനില് 3 ദിവസത്തേക്ക് 200MB യും 89രൂപയുടെ പ്ലാനില് ഒരു മാസത്തേക്ക് 3GB യും ഉപയോഗിക്കാവുന്നതാണ്. 89രൂപയുടെ പ്ലാന് activate ചെയ്യുന്നതിനായി GPRS89 എന്നും 13 രൂപയുടെ പ്ലാന് activate ചെയ്യുന്നതിനായി GPRS13 എന്നും 53733 എന്ന നമ്പറിലേക്ക് SMS അയക്കേണ്ടതാണ്. Airtel, Aircel മുതലായവയ്ക്ക് പ്രത്യേകം GPRS കാര്ഡുകള് ലഭ്യമാണ്. Mobile Phone settings ല് നിന്നും PC Connection type എന്നത് PC Suit ആക്കുക. അതിനു ശേഷം കേബിള് വഴി മൊബൈല് ഫോണ് കമ്പ്യൂട്ടറുമായി കണക്റ്റ് ചെയ്യുക. System-Preferences-Network connections എടുക്കുക. Mobile Broadband ക്ലിക്ക് ചെയ്യുക.

ശേഷം Add ക്ലിക്ക് ചെയ്യുക.


Apply ക്ലിക്ക് ചെയ്യുക. Connect automatically, available to all users എന്നീ options ടിക്ക് ചെയ്ത് Apply ക്ലിക്ക് ചെയ്യുക. close ചെയ്യുക. ഇത്രയും ചെയ്താല് connection established എന്ന മെസേജ് ലഭിക്കുന്നതാണ്. connection establish ആകുന്നില്ലെങ്കില് മുകളിലെ പാനലിലുള്ള നെറ്റ്വര്ക്ക് ഐക്കണില് ക്ലിക്ക് ചെയ്ത് mobile broadband എന്നതിനു താഴെയുള്ള connection name ല് ക്ലിക്ക് ചെയ്ത് ആക്റ്റിവേറ്റ് ചെയ്യുക. ഏതെങ്കിലും സമയത്ത് കണക്ഷന് കിട്ടാതെ വരികയാണെങ്കില് മൊബൈല് ഓഫ് ചെയ്ത് ഓണ് ചെയ്യുകയോ കമ്പ്യൂട്ടര് restart ചെയ്യുകയോ വേണം.